Quantcast
Channel: Blog - Sew DIY
Viewing all 289 articles
Browse latest View live

DIY Almada Robe by Seamwork Magazine

$
0
0
DIY Kimono Robe (Pattern: Almada Robe by Seamwork Magazine) | Sew DIY

Hi guys! I’m back with another Seamwork pattern. I finished this little beauty a few months ago and I’m just now getting around to sharing it. It was love at first site when I saw this robe in the February issue of Seamwork. By the way, how great is it to have a something to look forward to the first of every month? As soon as I start wondering where the year has gone and thinking about all the things I have left to do and the bills I need to pay, I remember that there’s a new issue of Seamwork to read! And then I start thinking about all the things I want to sew. Which is a never ending list. But, I’m so glad to have things that I want to make. I can’t imagine what I’d do with myself if the inspiration well ran dry.

DIY Kimono Robe (Pattern: Almada Robe by Seamwork Magazine) | Sew DIY

Anyway, back to the robe. This is the Almada Robe from Seamwork Mag. The design features sleeves built into the body and large sashes that tie in the front. But unlike a traditional robe, the ties do not wrap around the body, which creates a cocoon shape.

DIY Kimono Robe (Pattern: Almada Robe by Seamwork Magazine) | Sew DIY

I made a size Medium, which matches my measurements. The robe is so roomy though that most people would be able to wear any size. The shoulders are very sloped and the back of the neck stands away from my body a little bit. I do think my shoulders might be a little straighter than some and one the changes I’ve made to other Seamwork tops is to straighten out the shoulders (see the Hayden and Mesa). But while watching the Great British Sewing Bee, Patrick mentioned that a traditional kimono stands away from the neck. I immediately thought of this robe. And now that feature doesn’t bother me.

DIY Kimono Robe (Pattern: Almada Robe by Seamwork Magazine) | Sew DIY

The pattern was really easy to put together and I don't recall having any issues with it. There is a lot of hemming so if you use a slippery fabric, that might be a challenge. But I think it was pretty close to the estimated 2 hour sew time that the pattern lists.

If you haven’t read Seamwork yet, I highly recommend giving it a look-see. As I mentioned, it's a monthly sewing magazine with tons of inspirational articles and two new quick-sew patterns every month. The articles are free to read but as a subscriber (just $6 a month), you get monthly credits to download patterns that you can save or spend as you like. If you use this link to subscribe, you can get half off your first month subscription (and I'll get a little bonus from them too). The great thing about signing up now is that there are a whole lot of patterns in the library to choose from. 

DIY Kimono Robe (Pattern: Almada Robe by Seamwork Magazine) | Sew DIY

The design is definitely not traditional and that’s what makes it really fun. The robe in the magazine is made from double gauze and I so want a robe made from double gauze. Especially Nani Iro double gauze. I did hours of web searching for double gauze but couldn’t bring myself to pull the trigger.

DIY Kimono Robe (Pattern: Almada Robe by Seamwork Magazine) | Sew DIY

This robe is made in a light weight cotton voile from Michael Levine that I bought maybe two years ago. It’s perfectly nice but certainly not double gauze. I intended it to be a wearable muslin before buying any pricey double gauze. The fabric is a nice light weight with little rows of grey tulips. I love the subtle print and the grey color. One drawback to the voile is that it is see through so it doesn't do the job of covering up when someone unexpectedly knocks on the door.

DIY Kimono Robe (Pattern: Almada Robe by Seamwork Magazine) | Sew DIY

I have not been wearing the robe often because as it goes in Southern California, my apartment is not routinely cool enough to require a robe. But maybe as fall and winter roll along, I’ll put it in rotation and justify a future purchase of some dreamy double gauze. (Can you tell I'm more than a wee bit obsessed with the DG?)

Have you tried this pattern? Do you have a favorite robe pattern?


DIY Lounge Bras - Four Patterns Reviewed

$
0
0
DIYI Lounge Bras, 4 patterns reviewed | Sew DIY

Last year I never would have guessed that I’d be making jeans AND bras this year. But once you get started it’s not so hard. And when it coms to bra-making, it’s actually kind of addicting. One of the reasons I was so intimidated to sew a bra is that they are tricky things to fit. I mean it’s hard enough to buy a bra that fits, why would I want to spend a lot of time sewing one that might not fit? Well, I think my measurements have changed a bit in the last couple years and my go-to RTW bras aren’t fitting the way they used to. So I thought I might give the DIY version a go. 

There are some techniques used in bra making that it’s helpful to practice first, mainly attaching elastic. I got a lot of practice attaching fold over elastic (aka FOE) when I made these Geneva panties. Plus I’ve made a few swimsuits which is good practice. I started out trying some lounge bras first because the fit doesn’t have to be as perfect. Today I’m sharing my experience making a FOUR patterns for the first time. They’re all pretty different in style and it was fun to give them a try. For reference, my measurements are: Upper Bust = 35”, Full Bust = 38” and Under Bust = 31”.

DIY Lounge Bra, Florence Bra pattern by Seamwork Magazine | Sew DIY

First I tried the Florence Bra by Seamwork Mag. I had a lot of success making the Geneva Panties and the Reno/Dakota bikini so I thought I’d give this pattern a whirl. Plus I have a subscription to Seamwork so it was practically free to download. The pattern is designed to be used with stretch lace but for my first attempt I used some leftover 4-way stretch knit fabric.

Because I changed the fabric, I had to do things a little differently. To finish edges that would have been made of lace, I attached FOE to the front edge of the cup (piece A) and to the top edge of the back band. I made a size Medium. Before attaching the band elastic I tried it on and decided to take in the center back seam about half an inch. Otherwise, no sizing changes. It was really easy to put together and I found the instructions easy to follow.

DIY Lounge Bra, Florence Bra pattern by Seamwork Magazine | Sew DIY

If I make this again and don’t use the 6” stretch lace as recommended, I’ll probably change the shape of the back band. The recommended fabric would have a pretty scalloped edge along the back band. But in a regular fabric, the shape isn’t so elegant. I'd make a scoop similar to the Soma bikini down below.

The fit of the bra is comfortable but definitely not supportive. There is an option to include underwires which would probably help. I would have tried to add underwire but couldn't find any channeling. When I made the Reno swim top, I found that adding the boning to the side really helped give more support. It’s a good bra to wear when lounging at home and would work for light yoga but I wouldn’t wear it for going out.

DIY Racerback Bralette, Review of Josephine pattern by OhhhLuLu | Sew DIY

Next up we have the Josephine Bralette by OhhhLuLu. Lately I’ve been really into racerback style tops and I need a new racerback bra. I love OhhhLuLu’s designs and this is the first pattern I’ve tried. Like the Florence Bra, this one is not supportive enough for outdoor activity but it is very nice to wear around the house. I made a size Medium based on my bust measurement. The pattern only uses one measurement so I’m not sure how it applies to cup sizes. Again I used leftover 4-way stretch knit fabric.

DIY Racerback Bralette, Review of Josephine pattern by OhhhLuLu | Sew DIY DIY Racerback Bralette, Review of Josephine pattern by OhhhLuLu | Sew DIY

I really love the design. It would look better with contrasting fabrics for the centers and sides of the cups. I was a bit disappointed by the instructions. They are rather lacking in detail and I ended up consulting a few other patterns and tutorials during construction. I wished that there were suggested lengths for the elastic and either more detailed photos or illustrations.

I deviated from the instructions when sewing on the elastic band by applying it in the round. I sewed together the left and right side and marked the quarter points. I sewed the elastic into a loop and placed pins at the quarter points. I then pinned the elastic to the right side of the bra with the plush side up. When the elastic is turned to the wrong side, then the plush side will be against the skin.

I have worn this bra quite a few times but if I make this again, I'd make some big changes (namely a more supportive band). I’m really glad that I tried out this pattern. I got to practice my skills which is never bad. And I still want a racerback so I think I’ll use this style of straps attachment to convert a different bra pattern that has more support.

DIY Bikini Top, Review of Soma Bikini Top by Papercut Patterns | Sew DIY

For my third lounge bra, I used the Soma Swimsuit pattern by Papercut. I was inspired by this IG post from Papercut to use the pattern for lingerie. I like the idea of doing a wearable muslin in non-swim fabric because I’m much more likely to use it than a swimsuit. I used bikini top view 2, and according to my measurements cut between a S and M. I used a double knit fabric (leftover from a skirt) and skipped the lining.

DIY Bikini Top, Review of Soma Bikini Top by Papercut Patterns | Sew DIY DIY Bikini Top, Review of Soma Bikini Top by Papercut Patterns | Sew DIY

The design is pretty supportive with two pieces for each boob, a cradle underneath and a triangle that creates the center. It makes a great bra top but does create a uni-boob look. So, not great for wearing under clothes.

DIY Bikini Top, Review of Soma Bikini Top by Papercut Patterns | Sew DIY

After trying it on with my matching skirt, I immediately envisioned this extended into a dress. So va-va-va-voom. It would be easy to make but extending the bottom of the band and using the Nettie Bodysuit/Dress for the skirt. This was really easy to make and looks great combined with my Dakota swim bottoms. If I make it as a bra top again, I’ll do the straps with the rings and sliders like I did for the others.

DIY Longline Soft Bra, Review of Watson Bra pattern by Cloth Habit | Sew DIY

And finally, we have the Watson Bra by Cloth Habit. This is the most supportive of the bras I tried but it unfortunately is way too tight in the band for me. According to my measurements, I’m a 34C in the Watson. I think the size works for me I just need more stretch in the cradle (the piece under the bust).

The bra was pretty easy to sew (especially after all that practice) and there is a detailed sewalong to accompany the pattern. Again, there are not recommendations for the length of elastic to use but there is a helpful video and advice about how much to stretch the elastic.

DIY Longline Soft Bra, Review of Watson Bra pattern by Cloth Habit | Sew DIY

For this bra, I used the same 4-way stretch as for the Florence plus a thicker double knit for the back. I really debated about what to do for the cradle regarding lining.The pattern says you can use jersey knit for the lining but you might need a smaller band size. Not wanting to mess with the size and because I had some knit fusible interfacing, I decided to use it (also recommended). I cut according to the grain instructions on the pattern but since the fusible only has two way stretch, that meant there was no stretch at all in the cradle. I can put it on but it’s so uncomfortable that I can only wear it for about 45 seconds.

DIY Longline Soft Bra, Review of Watson Bra pattern by Cloth Habit | Sew DIY

The really hard thing sizing bras, besides all the curves and the support needed, is that different materials have different amounts of stretch. So, each garment is going to behave a little differently. Sigh. Oh yeah and you have to source a bunch of different materials. 

I do want to try the Watson again because I think it will be a good bra. But first I’m going to work through some other projects. I have bought power mesh with 10% lycra to use as the lining and I think that will give me better results. Have you tried bra making? Do you have a favorite pattern?

DIY Strappy Romper Refashion

$
0
0
DIY Strappy Romper Refashion | Sew DIY

I’ve been making a regular habit of evaluating my closet and weeding out the things that are not used. It helps keep the space under control and helps me figure out what new makes I need and what’s most likely to be worn. A few years ago I made a strappy dress from the book I Am Cute Dresses. I spent a lot of time getting the fit of those straps just right and while I liked it I rarely wore it. With all that time invested, I really didn’t want to part with it. So a refashion was in order.

DIY Strappy Romper Refashion | Sew DIY

The skirt of the dress was essentially a really big square with a hole in the middle for the waist. The volume of the skirt was actually one of the reasons I didn’t wear the dress. It was just too much to be really flattering. But with all that fabric, I was pretty confident that I’d be able to refashion it.

DIY Strappy Romper Refashion | Sew DIY

I used the Sanibel Dress/Romper pattern by Hey June to make a dress back in February (see it here) and it quickly became one of my most worn garments. I often wear it to work layered with a sweater to stay warm in the indoor AC environment. I’ve been wanting to also try the romper version so I decided to give it a whirl for this project.

DIY Strappy Romper Refashion | Sew DIY

This dress had a very similar construction to the Sanibel with a drawstring casing that is attached to the bottom of the bodice. I removed the skirt and cut out the shorts pieces using the Sanibel pattern. I was very lucky to discover that the waist of the shorts was a pretty exact match in size to the waist of my bodice. It really could not have been more perfect. I put together the shorts and attached it to the bodice. And it was all done. There are no closures on the romper. I just step in through the bodice and pull it on.

DIY Strappy Romper Refashion | Sew DIY

I made a size medium. There's plenty of ease in this pattern and for reference my measurements are roughly 38/28/39. The shorts do look pretty short but I think they're the right length for a romper. I did not change the length at all and for reference I'm 5'11" so they do look shorter on me than the average height.

DIY Strappy Romper Refashion | Sew DIY

The fabric is a little sheer which isn’t a big deal when you have a lot of volume in the skirt but this romper is more appropriate as a pool coverup or house only wear. I’ve been wearing it a lot around the house with one of my lounge bras. It’s super comfy and perfect for warm weather months.

DIY Strappy Romper Refashion | Sew DIY

I’d really like to make the Sanibel Romper again using the bodice that comes with the pattern. The only change I might make is to shorten the depth of the front scoop pockets. They are pretty long which makes for a more unique design but I might like them more a little shorter. Do you have a favorite romper pattern? Have you tried the Sanibel yet?

DIY Oversized Sweatshirt – Catrin by Schnittchen

$
0
0
DIY Oversized Sweatshirt – Catrin pattern by Schnittechen | Sew DIY

A couple months ago the lovely people at Schnittchen patterns asked me if I'd like to try out one of their patterns. They have so many interesting pattern designs that I had a hard time choosing one. I really liked the look of the Ute dress. But in the end, I settled on something that I expect to get a lot of wear out of, the Catrin Sweatshirt. I've made quite a few sweatshirts in the past year or so. But I wear them often enough that I thought there was room for one more, especially one like this oversized, cozy Catrin. 

DIY Oversized Sweatshirt – Catrin pattern by Schnittechen | Sew DIY

The design is very oversized with a drop shoulder, side insets, a high-low hem and a unique under arm seam that ends in a dart. I made a size 40 and it is plenty big. My bust measurement is 38" so I actually sized down a smidge. The oversized look reminds me of the eighties in all the best ways. As soon as winter sets in, I'll be donning this sweatshirt and leggings on the regular. I might even watch some Flashdance while I'm lounging.

DIY Oversized Sweatshirt – Catrin pattern by Schnittechen | Sew DIY DIY Oversized Sweatshirt – Catrin pattern by Schnittechen | Sew DIY

The instructions in the booklet are not super detailed so I consulted the English language photo tutorial. It's a pretty straightforward garment except for the underarm seam. Instead of a side seam there is a curved panel that is sewn to the front and back at each side. Then the sleeve cap is attached to the body. And finally the underarm sleeve is stitched, starting at the wrist and ending with a dart in the side insert. I didn't realize what I was supposed to do at first. But it all worked out ok and I really love this design feature. It's so unusual. I love it!

DIY Oversized Sweatshirt – Catrin pattern by Schnittechen | Sew DIY DIY Oversized Sweatshirt – Catrin pattern by Schnittechen | Sew DIY DIY Oversized Sweatshirt – Catrin pattern by Schnittechen | Sew DIY

The fabric is a kind of heavy loop back french terry. According to my Instagram (I scrolled way back to check), I bought it way back in January at the FIDM Scholarship store in downtown LA. I didn't have any trouble working it. It is thicker than some of the other sweatshirt fabrics I've worked with so the topstitching seemed to sink into the fabric. I think maybe lowering the tension on my machine would help this. By the way if you're looking for tips for topstitching knits, I put together a post about it right here.

DIY Oversized Sweatshirt – Catrin pattern by Schnittechen | Sew DIY

I've really enjoyed wearing this sweatshirt on the occasional cool night we've had this summer. It's so warm and comfortable. I'm sure it's going to be in frequent wardrobe rotation. A big thank you to Schnittchen for giving me this pattern. I really enjoyed sewing it and I'm looking forward to trying more of their patterns in the future.

Let's talk about WIPs

$
0
0
Let's talk about WIPs | Sew DIY

Ah the WIP. A person’s WIP tendencies say so much about one’s personality doesn’t it? Over the last few years, I was able to streamline my pile of WIPs to a very short manageable list. I started by doing a pretty major WIP purge, finishing or discarding as many projects as possible. But over the last few weeks it’s gotten out of control. I’ve actually developed a habit of starting a project and then when I hit a snag or get distracted, I just toss it aside and start a new project. I’ve felt more easily distracted than usual and it’s frustrating. I’d like to be putting more things in the done pile.

<Warning! This is an unusual, long rambling post. Bear with me I’m trying to sort out some feelings about my sewing process lately.>

I think perhaps I’ve been able to keep my WIP list short because I usual sew simple projects – things that were too quick to sew for me to become bored. And honestly I LOVE those projects. There is such satisfaction in being able to sew something in just a day. I actually had one dreamy Memorial Day weekend that I spent sewing a new outfit every day. Yeah. Multiple pieces a day for three days. A lovely, hermitic sew-cation.

My philosophy for sewing has always been that it should be an enjoyable process. It’s mostly a hobby for me, and as such, it should not make me feel stressed. But that does mean that I have a tendency to indulge my own whims. When my eye wanders to a new project, I often just dive right in. Especially lately. I see a new pattern I like and I can buy, download and print in just a matter of minutes.

While we’re talking about pdf patterns I might as well confess that I’ve always had a habit of preparing patterns way in advance of cutting and sewing. I have quite a few patterns printed out and some are even assembled that I have yet to sew. I know printing and assembling can be tedious for some but preparing pattern feels like an easy step to me. I dislike tracing but taping and cutting is easy-peasy for me.

For the last year or two I have kept a list of projects and the steps that need to be completed. It’s been a good way to keep myself focused, especially since I’m also trying to blog about all these projects. I have a calendar of planned posts but it is in constant flux because most days the last thing I want to do is sit at the computer. I’d much rather be at the sewing machine.

Sometimes that list feels like a chore. And I want sewing to be joyful, to be as far from stressful as possible. I also want my makes to be useful. I want to LOVE them. I want them to be objects that I use regularly, not art pieces shoved in a closet. Trust me I have quite a few never-worn pieces hanging in the closet. And it makes me kind of sad. So, I try to be a little more thoughtful with my choices. There are always going to be pieces that I love in conception but then never wear. It happens to everybody from time to time.

That said, there are some things that I make because I know I will learn from the process. For example, swimsuits. I rarely go swimming but I have learned so much from sewing swimsuits. I can sew the heck out of elastic and I now have the confidence of KNOWING that I CAN SEW MY OWN SWIMSUIT. That is significant. Next up will be more bras. And I’m really hoping they will be useful as well.

So, where am I going with this. Maybe I’m questioning why I’m a maker? What my motivations are? Maybe I’m looking for some solidarity from you dear readers? I cannot imagine a life without making. Making things keeps me getting up in the morning. I think I’m also questioning what my goals are. I’ve been feeling torn between different sewing whims, namely the things I feel compelled to sew and the things I know my wardrobe needs.

I feel like I used to be more disciplined than I have been lately. I used to make seasonal DIY wardrobe plans and I’d sew everything on the list, sharing one new make every week. I was regularly blogging 3-4 times a week. These days I feel like I can hardly put together one post a week. Last fall I made a list of things to make but still have at least one project not done. This year, I did create a "Make 9” list for the year. I’m actually pretty close to finishing. I have four things left and two of them are very close to done. Check it out below!

#2016MakeNine

  1. Sew Over It Ultimate Shiftdress (pattern printed and assembled)
  2. Scout Tee by Grainline Patterns
  3. Birkin Flares by Baste & Gather
  4. Rushcutter Dress by In the Folds
  5. Cosmic Sweater WATG (front and back knitted, 1.5 sleeves to go)
  6. Halifax Hoodie by Hey June
  7. Southport Dress by True Bias (pattern printed and assembled, one bodice piece cut out)
  8. Moji Pants by Seamwork
  9. Soma Swimsuit by Papercut Patterns (mostly sewn, but I ran into fitting issues and need to redo the bottom half)

So with all of those feelings out of the way and a new month upon us. Hello September! I’m feeling ready to move forward. I’ve made some progress this week and I’m going to mark that as a win. I’ve also used up a bunch of stash fabric. YAY!!!!!!!!!!!!!

Rumi Tank pattern by Christine Haynes | Sew DIY

WIP Recap September 2016

Finished this week yay!
I made 10 kennel quilts using stash felts. This is something I’ve been intending to make for a long time. It’s very satisfying to make these and send them off to shelters and animals in need. I made these early in the week and mailed them off yesterday. To find out more about this project go here and sign up for their newsletter. When shelters put out a call of quilts, you’ll get an email with their address.

I also started and finished a Rumi Tank by Christine Haynes this week. See it above. This is a fantastic quick project that distracted me from all the others. I found the Hawaiian print fabric in the remnant pile at Joann’s and just snatched it up.

Sampler Quilt work in progress | Sew DIY

Current WIPs

Note this is not my full list of things I want to make just the ones that are in progress. EEK!

1. Sampler quilt
I made these blocks over 10 years ago when I took a quilting class. Yesterday I made a lot of progress. I was able to finish piecing the quilt top and I’m almost done with the backing.

Butterick B6351 work in progress | Sew DIY

2. Butterick B6351 dress
This dress pattern jumped the queue in a big way. I’m using vintage fabric that came from my grandma’s stash. I’m really close to done but again I stalled out when it came to fitting. All I need to do is take in the side seams. NBD just annoying. Then insert the zip and hem. So close!

Soma One Piece work in progress | Sew DIY

3. Soma one piece swimsuit
This was almost done but when I tried it on I realized that I needed to add about 3 inches to the height of the bottoms. Eek! Fortunately I have lots of fabric. More easy to solve fitting issues that I just don’t really want to deal with.

Tea House Dress work in progress | Sew DIY

4. Tea House dress in red
The fabric is cut and ready to sew. Sometimes I just like cutting things out. I'm going to sew some other things first then this one. 

5. Cosmic sweater
Part of my Make Nine list. I made some good progress on this in August, finishing the back and starting the sleeve. Yay!

6. Knitted socks
(temporarily set aside in favor of the sweater)

7. Alexandria Trousers
I made these pants twice before. Once for me and a wearable muslin that my mom tried on and never gave back. :) My great-aunt Miriam liked my mom's pants so much that she requested her own pair. I have them cut out and will sew them today. I don't do a lot of sewing for other people but I'm so happy to make these for her. 

8. Spring Shorts
Another project with remnant fabric. Summer's almost over right? So I cut out these shorts last night from a gray-black seersucker. The fabric is more sheer than my other seersucker and I'm now thinking I may need to underline it. :(

With all these distractions, my many WIPs, and a new pattern design in the works, I’ve been feeling ill at ease, feeling that I’m not being as productive as I should be. A couple days ago, after first writing this rambling post, I gave myself a pass and spent about 10 hours yesterday just sewing with the flow. It was really great. All of a sudden it was midnight and I needed to go to bed. I've realized that my deadlines are completely self imposed. And I’m going to be a little easier on myself. I’d like to release another pattern as soon as possible but I’ve decided to take my time. The design is more appropriate for Spring anyway. And I need to be happy when I sew because otherwise it's just not worth it. 

Phew that's all a lot to do! By the way, I'm thinking I might make my WIP progress a monthly series. I'm sure that what I'm sewing in September is going to change a lot. It might be interesting to see how things change month to month. Now, I want to hear how YOU organize your projects. Do you ever get overwhelmed by your list? Have you made your Fall sewing list yet?

DIY Extra Long Leggings – Virginia Leggings pattern review

$
0
0
DIY Extra Long Leggings | A review of the Virginia Leggings pattern by Megan Nielsen | Sew DIY

I’ve made leggings a few times before using a pattern that I drafted myself. They are great but not perfect. I learned some things from those makes. Firstly, that leggings are very, very quick to sew. Second, that it’s really important to have fabric with a lot of stretch. This time around I used the Virginia Leggings pattern by Megan Nielsen. I’m happy to say that this latest pair is my favorite.

DIY Extra Long Leggings | A review of the Virginia Leggings pattern by Megan Nielsen | Sew DIY

I made these leggings right before my trip to Europe in June and I was so glad to have them with me. There were a few chilly days while I was there and I was very happy to have these as an extra layer.

DIY Extra Long Leggings | A review of the Virginia Leggings pattern by Megan Nielsen | Sew DIY

I’ve had really good experiences with Megan Nielsen patterns in the past and was excited to try this one too. I made version which is designed to sit at the natural waist and has an extra long inseam that creates a rushed effect at the ankle. A few of my previous pairs of leggings were made too short (my fault!) so I was happy to have these be extra long. The inseam for  version 1 is 35 inches. Even though I’m 5’11” I carry a lot of my height in my torso so this was a great length for me.

DIY Extra Long Leggings, pattern review of Virginia Leggings by Megan Nielsen | Sew DIY

I made either a size S or M as my measurements are between the two – waist=28, hips=39. (I’m not with my pattern stash right now but I’ll try to update later.) The fit is really good for me and the pattern went together really easily. Leggings are seriously one of the easiest things to sew. You just sew up the inseam, the crotch, then the waistband and hem.

The fabric is a 4-way stretch from Joann’s. It’s pretty basic, lots of stretch and thick enough to not have any show through. I learned from my previous experiences making leggings, it’s important to have lots of stretch. The more stretch there is the more comfy they’ll be.

DIY Extra Long Leggings, pattern review of Virginia Leggings by Megan Nielsen | Sew DIY

I finished the hem and waistband using a zig zag stitch and surprisingly some of the stitches have popped. Most of the time when I sew knits, I use a twin needle to topstitch (check out my twin needle topstitching tips here) but as these are black and the waistband is usually covered up, I wasn’t worried about how it would look. I’m not really sure why some stitches popped. Maybe I should have stretched it a little bit while sewing? Or maybe I should have used wooly nylon in the bobbin. But no big deal. If it starts really coming apart, I’ll redo it. I used the serger for all the seams and those are all fine.

DIY Extra Long Leggings, pattern review of Virginia Leggings by Megan Nielsen | Sew DIY

I’m kind of set in the leggings department right now but next time I need another pair, I will definitely use this pattern again. If you’ve never sewn leggings I highly recommend trying it out. I haven’t worn these very much since returning from Europe because it’s been too darn hot in LA but as the temps cool I expect to be getting a lot of wear out of the this winter. For ultimate coziness, I’ll likely be wearing them with a Lou Box Top (as seen here :) and my Catrin Sweatshirt. Have you tried this pattern? Have you sewn leggings before?

Five Fall Sewing Patterns for a Classic Wardrobe

$
0
0
Sew yourself a classic fall wardrobe with these 5 Sewing Patterns | Sew DIY

With the change of seasons I inevitably think about what I’d like to be wearing in the coming months. Living in Los Angeles, it does tend to be almost the same weather all year long. Despite the constant warm temps, we do like to change our style of dress. Otherwise there’s really no way to know what month is. As always, I will be wearing a lot of my own patterns. I’m particularly looking forward to wearing the Nita Wrap Skirt with tights this Fall and making more knit Lou Box Tops (going down one size gives a great fit). I’ve also been thinking about making another pair of jeans. After all, I probably wear jeans more than any other garment.

But there are a few patterns that I have not tried yet that I’m really excited to sew this season. I already have all the patterns and fabric to go with them. Just stitching left to do. :) With the exception of the Nehalem Pants, these patterns could all be categorized under basics. I expect all of them to be wardrobe workhorses.

5 Fall Sewing Patterns for a Classic Wardrobe

1. Nehalem Pants by Sew House Seven
It was love at first sight with me and these pants. I'll be sewing them up soon. So stay tuned!

2. Lark Tee by Grainline Studio
I'm really looking forward to trying this one. My t-shirt drawer is overflowing but I there are a lot of shirts in there that I don't love. I'm hoping that this pattern will become a go-to for basic t-shirts.

3. Victoria Blazer by By Hand London
I was really excited when this pattern was added to their pdf collection. I have the pattern printed and assembled and some black linen washed and ready. 

4. Ultimate Shift Dress by Sew Over It
This pattern is on my 2016 Make Nine list and I keep meaning to make it but get distracted. Isn't that always the case? I have the pattern printed and assembled. I just need to choose some fabric. I think the version with sleeves will be great for Fall.

5. Driftless Cardigan by Grainline Studio
Working in an air conditioned office, I always need to have a sweater on hand. Somehow I've ended wearing the same 2 or 3 sweaters all the time. A long cardigan like this is a neutral color will be perfect for throwing over any outfit.

Et voila! My fall sewing project list is all sorted. There are probably about 10 other things on the list too but with so many great things out there, how can I resist? What sewing projects are you going to be working on this fall?

How to DIY Cropped Sailor Pants

$
0
0
How to DIY Cropped Sailor Pants | Sew DIY

One of the biggest trends for Fall is the cropped flared pants. I have yet to try out this style but I am intrigued. I like that it’s a little narrower than the traditional culotte which I find can be a tad overwhelming. I especially like the silhouette seen here that is a little less flared than some, with an almost straight leg that has a gentle flare at the hem. Read on to see how I would DIY this pair of RTW pants.

How to DIY Cropped Sailor Pants

Step 1: Today’s inspiration is Level 99 Crop Sailor Pants from Anthropologie. These are such a fun style that can be worn to work or out on the weekends. The button details are really fun and interesting but because they are black on black, they are not overwhelming.

Step 2: For the pattern, I chose Vogue V1464. This is a pattern that I’ve had in my stash for a while. I love the sailor style button detailing. I think it’s a good pattern to have in the arsenal. It’s a classic design and you can always change the leg shape to fit current fashions. Like our inspiration pants, this pattern uses an invisible zipper at the side seams and the buttons are decorative. To achieve the cropped style of the RTW pants and depending on your height, you’ll need to shorten the pattern to a couple inches above the ankle bone.

Step 3: For the fabric, you’ll want something that is a nice bottom weight and has a bit of stretch for comfort. I chose Kaufman Ibiza Stretch Twill Black from fabric.com. It’s a medium weight with 3% spandex and should work well for pants.


5 Tips for Better Pressing

$
0
0
5 Sewing Tips for Better Pressing | Sew DIY

Every sewist knows that the sewing machine is your number one bff. But did you know that the iron is your close #2? Yes! Almost as important as stitching is pressing. A proper press can mean the difference from a shabby garment and one that is looks super professional. Here are a few tips that I've learned along the way to press your me-made garments and avoid damaging them along the way.

5 Sewing Tips for Better Pressing

1. Test the iron on a scrap of fabric first to find the right heat level
It can be so easy to burn or even melt your fabric. It’s happened to the best of us. So before you ever touch iron to fabric, test out different heat and steam levels on a scrap of the fabric.

In general, I’ve found that the heat recommendations for fabric type listed on my iron are correct. But it’s always best to start with a low heat and work your way up, especially when you don’t know the fiber content or are working with synthetic fabrics. You’ll know that the iron is warm enough when you can press a crease in the fabric or remove a crease. I was recently ironing a linen dress and to remove the wrinkles, I had to turn the dial all the way up to the linen setting (duh!). I rarely use the iron that hot but sometimes the fabric requires it.

2. Use a press cloth
If you have a really delicate fabric, use a press cloth to protect it from the iron. The press cloth creates a barrier between your project and the iron, reducing the amount of heat and steam that hit the project. Simply lay your project on the ironing board then place the press cloth on top and press away. I often use an old kitchen towel for this but that can be hard to see through. Alternately you can use a piece of silk organza as a press cloth (great tips for making one here). You’ll not only feel fancy but you’ll be able to see through the sheer organza and make sure your project isn’t wrinkled.

3. Be gentle
Just as fabric can be burned or melted it can also be warped or stretched when pressing. Even though we call this activity “pressing” you really don’t need to press with the iron at all. Let the weight of the iron be the only pressure put on the fabric and don’t add to it. Save those muscles for the gym! :) If you think you might be using too much pressure with your iron, try to adopt an up and down motion, lifting your iron from place to place instead of sliding it.

4. Press every seam after sewing
When sewing woven fabrics, it’s important to press each seam after you sew it. Pressing your seams flat (either open or to the side as the pattern requires) will help it fit better with the next part of the garment. If the seams are not pressed flat, you risk getting wrinkles and bubbles when it’s stitched to another piece of fabric.

Bonus tip: When I took a quilting class years ago, the instructor recommended pressing the seam itself to set the stitching before pressing it open. I don’t really know if it makes a difference but it can’t hurt right?

5. Use tools to help press the tricky stuff
If you sew regularly, there are a few pressing tools that are worth the investment. I was lucky enough to inherit my tools. Over the years, I’ve slowly learned how to use them and I’m always impressed by how well they create a nice flat press on tricky seams. The tailor’s ham is a rounded cushion that is used instead of the (flat) ironing board to press a curved seam. They come in different sizes and you can even make your own.

The sleeve ironing board is a smaller ironing board that makes it easy to press small tubes like sleeves. I use it all the time and not just for sleeves.

The clapper is a really cool tool that I only recently learned how to use (from this amazing post). It’s just a wooden block but rather ingenious. If you have a fabric that is difficult to press flat but sensitive to heat, do a little press, remove the iron then pop the clapper on top of the fabric trapping the heat and steam inside. Because you’re not continuing to add heat, the fabric won’t burn but trapping it there will result in lovely flat seams.

DIY Luau Racerback Tank - Review of the Rumi Tank pattern

$
0
0
DIY Luau  Racerback Tank – review of the Rumi Tank pattern by Christine Haynes | Sew DIY

The racerback silhouette has become a staple in my wardrobe over the last few years. There's really no better way to show off all those push ups and lat pulls than a racerback top. So of course when Christine Haynes released the Rumi Tank/Dress I had to snatch it up. This pattern is the first in a new collection she is developing of quick to sew patterns (yay! just my style!) called Chop Chop.

DIY Luau  Racerback Tank – review of the Rumi Tank pattern by Christine Haynes | Sew DIY

Shortly after I bought the pattern, I found this hawaiian print in the remnant bin at Joann's. It was pretty big for a remnant at about 7/8 yard. I had a luau to attend over Labor Day weekend so I snatched up the fabric and started making right away. The fabric is a kind of thin, knit fabric. I was hoping that I could get a dress out of it but it wasn't quite long enough. I have some scraps left and I'm thinking they will make some really fun panties. (Check out my DIY underwear sewing adventures here.)

DIY Luau  Racerback Tank – review of the Rumi Tank pattern by Christine Haynes | Sew DIY DIY Luau  Racerback Tank – review of the Rumi Tank pattern by Christine Haynes | Sew DIY

When I first opened up the pdf files, I was a little surprised that there were separate pattern pieces for the top and dress. I had assumed that they were the same, just lengthened for the dress. In fact, the dress and top have a different fit and ease, the tank being much more fitted at the waist and hips. If you look at the technical drawings the difference is quite obvious. I just wasn't looking. :) 

DIY Luau  Racerback Tank – review of the Rumi Tank pattern by Christine Haynes | Sew DIY

To topstitch the neckline and arm openings, I used my tried and true method of using a twin needle and wooly nylon thread in the bobbin. I wrote a blog post about this method right here.

DIY Luau  Racerback Tank – review of the Rumi Tank pattern by Christine Haynes | Sew DIY

For my first go at the pattern, I made between a size 10 and 12. I didn't want it to be super fitted at the waist and hips and my bust measurement is a little bigger than size 10. I cut the length at the biggest size and added a little freeform curve to the hem when I cut it out. I didn't draw it out before hand, just took the rotary cutter and eyeballed it.

DIY Luau  Racerback Tank – review of the Rumi Tank pattern by Christine Haynes | Sew DIY

This was really easy to sew, especially because I've made a few racerbacks before using patterns I traced from RTW. I didn't read the instructions super carefully because I was pretty confident about what I needed to do. The instructions include clear and colorful photos of all the necessary steps and some tips for sewing with knits. The pattern is really perfect and a lot better than the last one I traced which always turns out a little twisty.

DIY Luau  Racerback Tank – review of the Rumi Tank pattern by Christine Haynes | Sew DIY DIY Luau  Racerback Tank – review of the Rumi Tank pattern by Christine Haynes | Sew DIY

I really like this top and it was really fun to wear at the luau. Here I'm wearing the top with another of my favorite makes from the summer, the Alexandria Trousers. I'm sure I'll be using this pattern again, and will likely be making the dress too. This was actually my first time sewing a Christine Haynes pattern and I really enjoyed it. I'm looking forward to seeing more of the Chop Chop collection as quick and easy are right up my alley. 

Moodboard – Fall Fashion

$
0
0
Fall Fashion Moodboard | Sew DIY

The change of season is always a good excuse to reevaluate one’s wardrobe and buy (or make!) something new. This season, I’m looking to add lots of easy to wear separates to my wardrobe. Things that can layer for warmth and be dressed up with a touch of jewelry. I have a few DIY plans in the works that I’ll be sharing in a couple of weeks but meanwhile, here are a few of my top RTW picks for the fall season.

Top row from left: Moto Jacket  //  Mascara  //  Striped Tee  //  Aviator Sunglasses  //  Leather Bag  //  Navy Peplum Top

Bottom row: Oversized Cardigan  //  White Sneakers  //  Flared Jeans  //  Arrow Necklace  //  Lip Stain  //  Booties  //  Green Blouse

For more fashion picks and inspiration, follow me on Pinterest.

DIY Tutorial – Clear Vinyl Zippered Pouch

$
0
0
DIY Tutorial – How to Sew a Clear Vinyl Zippered Pouch | Sew DIY

A few years ago I ended up with a bunch of clear vinyl material and it's just been sitting in my closet ever since. I couldn't bear to throw it out because I knew that one day I'd find a use for it. Then a few weeks ago, I suddenly had the idea that it would make a fun and easy to sew zippered pouch. Reminiscent of the pouches we used to put in our three ring binders to hold all of our pens, pencils and erasers (gotta have the big pink eraser, right?) this is a flat pouch with a zipper running down the front. I love that this pouch can feature a show-stopping zipper and that the clear vinyl makes it really easy to find just what you're looking for.  

DIY Tutorial – How to sew a Clear Vinyl Zippered Pouch | Sew DIY

This design is so incredibly simple. It only has 3 sewing lines (two for the zipper and one around the edges), but it’s an design that’s really easy to adapt and fun to play with. You can make this pouch any size you like, depending on your needs. Make one sized to go in a binder for that special student in your life or make it smaller and use an everyday makeup bag (as I did below). Adjust the fold to place the zipper at any position on the pouch. Or get a little more adventurous and try different shapes with the vinyl. You could center the zipper at the top of bag and square off the bottom to create a stand up pouch. It's also a great project for using that flashy zipper you’ve been hoarding. Or even cut the vinyl into the shape of a heart or star. 

Click to learn how to make a super easy makeup pouch.

Sewing with vinyl can be a little intimidating but it’s totally doable with any basic sewing machine. There are some great posts out there with tips (here, here, here and here if you want to read). But I’ll include the necessaries here. Vinyl can be sticky, making it hard for the machine to feed it through. You can buy a special Teflon sewing machine foot or just put some scotch tape on the bottom of your regular foot to create a slippery surface. You can also put a piece of tissue paper in between the feed dogs and your vinyl to help it move through. In my tests, I found that I only needed one or the other. So, when I stitched the zipper, I used my zipper foot without tape and put tissue paper underneath. To stitch the sides of the pouch, I used my regular foot with scotch tape on the bottom.

DIY Tutorial – How to sew a Clear Vinyl Zippered Pouch | Sew DIY

How to DIY a Clear Vinyl Zippered Pouch

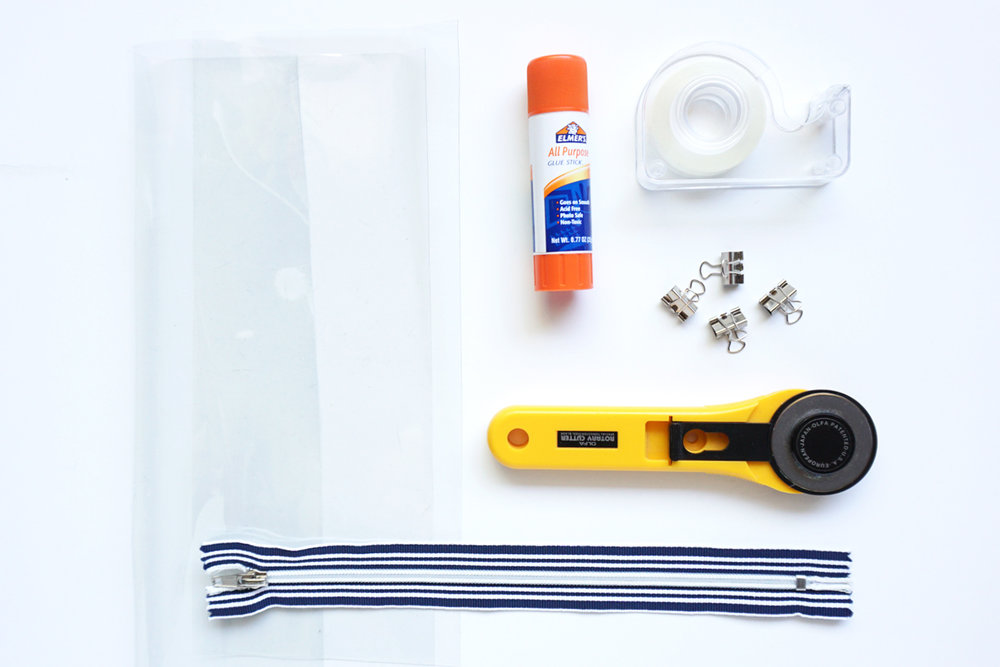
SUPPLIES
clear vinyl
zipper (Here I’m using one that is 12 inches long and 1.25 inches wide but it’s easy to adjust for other sizes.)
thread

TOOLS
sewing machine
leather sewing machine needle
rotary cutter & self healing cutting mat
binder clips (instead of pins)
glue stick
scotch tape or scraps of tissue paper

INSTRUCTIONS

Step 1: Cut one piece of vinyl 5 1/4” x 12” and cut one 10” x 12”.

DIY Tutorial – How to sew a Clear Vinyl Zippered Pouch | Sew DIY

Step 2: Prepare your machine for sewing vinyl. Insert a leather needle into the machine and thread up. You can use a non-stick (Teflon) machine foot or stick some scotch tape on the bottom of the foot, leaving the opening for the needle tape free. You can also put some scotch tape on the throat plate.

Test your setup on a scrap of vinyl. You may need to adjust the thread tension. Use a longer stitch length than usual and don’t backstitch. Just leave the thread tails long, knot them and then trim.

Step 3: Apply a thin strip of glue to the wrong side of the left side of the zipper and adhere to the top of the smaller piece of vinyl, overlapping by 1/4 inch. Let the glue dry.

DIY Tutorial – How to sew a Clear Vinyl Zippered Pouch | Sew DIY

Top stitch in place, stitching with the zipper facing up. Repeat with other side of the zipper and the longer piece of vinyl (as seen above).

DIY Tutorial – How to sew a Clear Vinyl Zippered Pouch | Sew DIY

Step 4: Fold longer piece of vinyl to the back side of the zipper, aligning the raw edges of the vinyl. The fold should be about one inch from the right hand edge of the zipper. Hold vinyl in place using binder clips. Do not use pins as this will create permanent holes in the vinyl. Stitch around the three sides leaving long tail threads. Knot the threads, weave into the stitching and trim. Trim any uneven edges of the vinyl with a rotary cutter.

DIY Tutorial – Clear Vinyl Zippered Pouch | Sew DIY

You can also apply bias binding to the raw edges. Just align the raw edges of the vinyl and glue baste the bias tape to the edge, folding in the raw edge of the bias tape at the ends. Then topstitch in place. Use any color or print bias tape for a super fun look.

DIY Tutorial – How to sew a Clear Vinyl Zippered Pouch | Sew DIY

One of my favorite ways to use this bag is to carry knitting notions. I love to take a knitting project with me when I'm traveling and it's so convenient to have all my notions kept tidy and convenient in this clear pouch. If you haven't tried sewing with vinyl before, it's not as challenging as you might think. Find yourself a scrap and give it a try with one of these easy little pouches. It's a great project to make as gifts or just for yourself. Happy sewing!

DIY Seersucker Spring Shorts

$
0
0
DIY Seersucker Spring Shorts | Sew DIY

This seersucker shorts are my last official summer make. In the warmer months, shorts are one of my favorite garments to wear on days when I don't go to the office. And if I'm going to be lounging around or just running errands, a drawstring waist is perfection. These have the fun addition of a paper bag style waistband and curved hem.

DIY Seersucker Spring Shorts | Sew DIY

This pattern has been on my list for a long time. It’s the Spring Shorts by Pattern Runway, a free pattern from Peppermint Magazine. (By the way the latest pattern from Peppermint is this peplum top by In the Folds and I’m dying to try it.) This was the first time I’ve made a pattern by Pattern Runway. Makes me think I should check out their other patterns too. Ah! The sewing list never ends!!!

DIY Seersucker Spring Shorts | Sew DIY

I couldn’t find finished measurements listed in the pattern which would have been nice because I was between size 12 and 14 in the hip. I ended up cutting between the two and cutting the length at the largest size. The hems are finished with a facing and I had to redraw that to fit my new hemline. The shorts fit fine but it would be ok if there was a touch more ease at the hips. The length works well too, I definitely wouldn’t go any shorter (I’m 5’11”).

DIY Seersucker Spring Shorts | Sew DIY DIY Seersucker Spring Shorts | Sew DIY DIY Seersucker Spring Shorts | Sew DIY

The fabric is a slate black seersucker from Joann’s. I found a piece in the remnant bin a few months ago but it wasn’t quite enough for shorts. Then I found a second piece and I had enough. To my surprise the seersucker is thinner and more sheer than some other seersucker I have in my stash. So to prevent panty show through, I actually underlined these babies. In the past, I’ve had problems with underlining being a bit shifty. I had read that hand basting the underlining to the fashion fabric helps prevent the shifting. So then I hand basted! Very unlike me to do fussy steps like that but the hand basting really worked. And just look how pretty the insides of the shorts are! There is one little spot by the hem where I burned the underlining fabric. Always a bummer but no one will know about those little holes. :)

DIY Seersucker Spring Shorts | Sew DIY

These were pretty straightforward to sew. I liked that the pockets and pocket bags were all in one piece, created by a fold at the front edge (see the photo above of the inside of the shorts to see the pockets). The waistband of these shorts is a paper bag style that sits at the waist. It’s a fun style and probably works best with a tucked in or cropped shirt so you can show off those waistband ruffles.

DIY Seersucker Spring Shorts | Sew DIY

These shorts are pretty similar to the Alexandria shorts I made recently with similar fit and style lines. So obviously it’s a style that I like. haha. I really like trying out new patterns by different pattern companies because it's fun to see how different styles fit and to learn from the different construction techniques. The more you try different styles, the more you'll learn about what works for you body and your lifestyle.

DIY Outfit – Cropped Wrap Pants

$
0
0
How to DIY Cropped Wrap Pants | Sew DIY

I love when a new silhouette hits the fashion scene, especially when it's pants. Culottes? Flares? I'm totally there. So when I started seeing wrap pants, I instantly fell in love. I love that they look casual yet are super interesting. You could never look like you're not trying in a pair of these pants but at the same time they look so comfortable to wear. Read on to see how I would DIY these denim wrap pants.

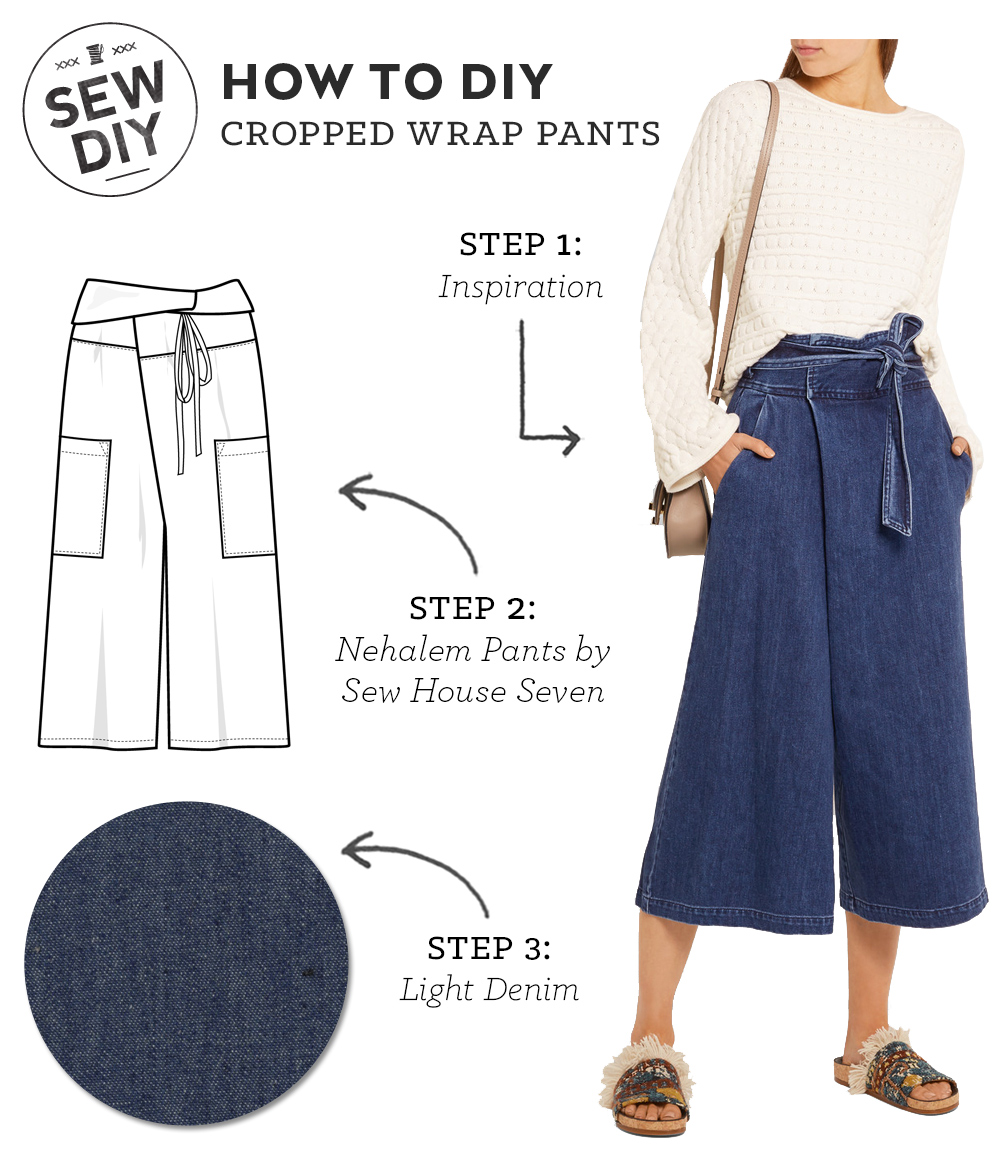
How to DIY Cropped Wrap Pants

Step 1: Today's inspiration is this pair of denim cropped wrap pants by SEA.

Step 2: The Nehalem Pants pattern by Sew House Seven is perfect for recreating the cropped wrap style. Move the pockets closer to the waist and add an angled opening for your hands to get a look closer to the inspiration pants. If you're not a fan of the cropped length, the pattern also has a full length version.

Step 3: A nice light-weight denim is the ideal choice for wrap pants. I found this 6 oz denim in classic blue from Fabric Depot. Unlike a lot of denim styles, this wrap style does not require stretch.

For more DIY inspiration, follow me on Bloglovin and Pinterest.

Style Maker Fabrics Fall Tour - Driftless Cardigan and Nehalem Pants

$
0
0
Fall Blog Tour with Style Maker Fabrics, featuring Driftless Cardigan and Nehalem Pants sewing patterns | Sew DIY

I was so honored and thrilled when Michelle asked me to take part in the Style Maker Fabrics Fall blog tour. It’s an amazing group of sewists she has assembled and the fabric we had to choose from was equally inspiring. Living in LA, it’s generally warm here but in the fall nights become cool. Plus, I have the year round indoor AC to battle. With this in mind, I’ve been wanting to sew more separates that I can layer. I decided to make two new-to-me patterns, the Driftless Cardigan by Grainline Studio and the Nehalem Pants by Sew House Seven.

Style Maker Fabrics Fall Blog Tour - Nehalem Pants | Sew DIY

Let’s start by talking about these pants. The pattern is the recently released Nehalem Pants by Sew House Seven. The style is so unusual and yet I also very reminiscent of thai fisherman pants. They are built with LOTS of ease at the waist and the fabric is folded over in the front and held in place with a tie belt. These would be perfect for big eating days when you might need a little extra room. ;) I just finished these pants this week and I have not had the chance to road test them yet. I think if you’re worried about the tie holding them up, you could add a couple of sew-on snaps.

Style Maker Fabrics Fall Blog Tour - Nehalem Pants | Sew DIY

The fabric is a really beautiful tencel shirting with a nice drape. The lighter weight is nice because it doesn’t create extra bulk at the wrap front. But it also has no show through so I didn’t have to worry about lining. The classic chambray blue color just makes my heart go pitter pat. It’s an almost neutral that can go with pretty much any other color.

Style Maker Fabrics Fall Blog Tour - Nehalem Pants | Sew DIY

Michelle did a great job of recommending a fabric for this pattern. I probably wouldn't have chosen a shirting fabric but this is really the perfect fabric. When I was choosing my fabric, I told her the pattern I wanted to make and the color I wanted and she recommended a few that would work. It was so helpful! And I know I'm not the only one she helped, because Sara shared that she had the same experience in her post yesterday

Style Maker Fabrics Fall Blog Tour - Nehalem Pants | Sew DIY

The fabric was really easy to sew and responded well to topstitching (the pattern calls for lots of topstitching). I used a matching light blue/grey thread but it could be fun to use a contrasting color too. Check out all of Style Maker's fabric in this category here. There are definitely a few more that I'm eyeing. 

Style Maker Fabrics Fall Blog Tour - Nehalem Pants | Sew DIY

I made a size Medium which matched my measurements well (waist 28”, hips 39”). I did not change the length when cutting but did make a pretty small hem at the bottom. I think the length works well for me even though I’m 5’11”. If I were to make them again I would consider adding length to the crotch depth though. Maybe just an inch? I'm also wondering if a more defined crotch curve would be more flattering for the backside. I think the traditional fisherman's style does not have a lot of curve but it would be interesting to combine the wrap with a more standard crotch curve. 

Style Maker Fabrics Fall Blog Tour - Nehalem Pants | Sew DIY

The instructions were really easy to follow and I kind of enjoyed the puzzle piece of the different shapes and the topstitching too (cooperative fabric always makes topstitching fun, doesn’t it?). I made waistband style #1 which is folded in half and stitched down so that the wrong side is not exposed.

Style Maker Fabrics Fall Blog Tour - Nehalem Pants | Sew DIY

Time will tell how much these pants get worn. There is something about an unusual style that makes me nervous sometimes. Oh to be braver!! Mostly I would hate someone to think that I’m wearing my pajamas. And believe me, they are so comfy they could pass for pjs. Here I’m wearing it with a short sleeve black Nettie bodysuit (unblogged). The slim fit of the bodysuit really shows off the waistline but any slim fitting shirt would work well. 

Style Maker Fabrics Fall Tour - Driftless Cardigan | Sew DIY

Next up is the Driftless Cardigan by Grainline Studio. Cardigans have a constant place in my wardrobe. Most days, I carry one with me in case I get cold. I actually wear them more than I do a coat. The Driftless Cardigan has all the essentials for an everyday cardigan, on oversized fit and built in pockets. The fabric I chose for my cardigan is a super soft variegated sweater knit. It's a really dreamy fabric. I can't tell you enough how SOFT it is. And if you're in the mood to ogle some pretty fabrics (and who isn't, right?) check out more sweater knit fabrics here

Style Maker Fabrics Fall Tour - Driftless Cardigan | Sew DIY

Before cutting into my fabric, I made a muslin using a stretchy knit fabric. I almost think my muslin fabric had too much stretch (it just seems a little weird for a sweater) but I’m really glad that I tested the pattern. I was able to test out the construction and find a couple places where I wanted to change the fit. The main thing was I thought the sleeves were too tight in the upper arm (I do not have large arms btw). For a cardigan, I like the sleeves to be a little loose so that I can layer things underneath without any lumps. It was easy to change the sleeve, I just added .5 inch to each side of the sleeve and moved the notches on the front and back body to match. I did not need to change the armscye at all.

Style Maker Fabrics Fall Tour - Driftless Cardigan | Sew DIY

I also added 4 inches to the length of the cardigan. I’m 5’11” and I like my cardigans to go past my bum. If you lengthen yours, don’t forget to also lengthen the neck binding. I forgot and had to recut it. oops! I love the fit of this cardigan. It is just perfect. I’ve worn it a ton of times already. The fabric is just so dreamy and soft. I love putting my hands in the pockets, because SOFT.

Style Maker Fabrics Fall Tour - Driftless Cardigan | Sew DIY

I really like the Driftless Cardigan pattern. It’s the exact garment that I need almost everyday of the year. I was surprised by a couple things in the pattern though. One, the seam allowance is only 1/4 inch, instead of the usual 3/8 inch for knit fabric. Second, there’s a lot of hand finishing for a knit garment. I am not a fan of hand finishing as I find it rather tedious. sigh. But this was fine. I just used a regular slip stitch (not a stretchy one, see my tutorial here) because the neck binding really doesn’t get pulled and stretched a lot.

Driftless Cardigan interior thread chain pockets | Sew DIY

For the thread chains to connect the pockets, I used the thread chain made by my serger. So much faster than making one by hand. Yay! When you serge the edge of the pocket seam allowance, just leave a chain coming off each end of the pockets. Then later use a needle to thread the chain through the hem seam and knot it. Above is a photo of my wearable muslin so you can see the chains. 

Style Maker Fabrics Fall Tour - Driftless Cardigan and Nehalem Pants | Sew DIY

I chose not to make buttonholes in either sweater. Partly because I’m really nervous about making a buttonhole in knit fabric but mostly because it doesn’t really need buttons. I will definitely be making the Driftless Cardigan again, preferably in a super soft fabric like this. I really love my new Fall outfit and I’m looking forward to the weather cooling (hopefully) soon! It was a shocking 90+ degrees the day I took these pictures. I was definitely sweating in the sun! 

Style Maker Fabrics Fall Style Blog Tour 2016

A big THANK YOU to Style Maker Fabrics for asking me to join their Fall Blog Tour and providing me with fabric. Make sure to check out all the other amazing bloggers on the tour (next up is Marcy aka Oonabaloona!) and the gorgeous fabrics Style Maker has for Fall. AND until Oct 3, Style Maker is offering discounted shipping (just $5 for US). 


Let's talk About WIP's – What I sewed in September

$
0
0
Let's Talk About WIPs – What I sewed in September | Sew DIY

Doesn’t it seem like October really snuck up on us? September was a very busy month for me and I’m fortunately feeling more focused with my projects, much better than last month to be honest. Phew! My work schedule has been pretty unpredictable lately and it’s stressing me a bit. I do rather like a routine. I kind of feel like the more I have to do, the more I’ll actually get done.

To get myself feeling a little more organized, I started using the app Todoist for my checklists. I think it’s a little more advanced than my previous check list app, Any.do. I actually really like using the online version, go figure. I’m also just starting to try out CoSchedule for blog post planning which I hope will help automate some stuff for me. I’m working my way through my last summer makes and have two newly finished dresses to share with you soon.

So now on to my projects! To catch up on last month's list check out this post. At the beginning of September, I had 8 WIPs and I've gotten it down to 6. Yay! It was actually down to four before I cut out two new projects last weekend. I also had two projects to make as part of the Style Maker Fabrics Fall Style Blog Tour, the Driftless Cardigan and the Nehalem Pants. My deadline for those really snuck up on me. I made a trip to the Pacific Northwest the last weekend of September but somehow in my mind I thought there was one more weekend left. Fortunately, I had a couple days off work and got to finish up. 

Let's Talk About WIPs - What I sewed in September | Sew DIY

September Finished Projects

1. Seersucker Spring Shorts
2. Tea House Dress in red (to be blogged very soon!)
3. Clear Vinyl Zip Pouch
4. Driftless Cardigan (wearable muslin and final, so it kinda counts as 2!) 
5. Nehalem Pants
6. Green/Blue Plaid Dress Butterick B6351 (to be blogged soon!)
7. Alexandria Pants (gift for my great-aunt)

Let's Talk About WIPs - What I sewed in September | Sew DIY

Current WIPs

1. Alder Dress
Cut out and partially sewn. I bought the fabric for this back in the Spring. I've finally made the FBA and length pattern adjustments to the pattern. I have high hopes. Fingers crossed!!

2. Black Linen Victoria Blazer
Cut out and ready to sew. I was so glad to find lots of black lining fabric in my stash. Always a good idea to stock up on basic lining, interfacing and thread. 

3. Sampler quilt
This needs quilting and binding, but I've stashed it in the closet for now.

4. Soma One Piece Swimsuit
This is/was nearly finished but I've discarded it due to poor fit. I really should have known that a wrap front would not work well with my bust. Sigh. I did a version of the Soma bikini top out of knit fabric that I really like wearing as a lounge bra. So I think I'll just end up doing a two-piece and maybe lengthening the bra top for a little extra coverage.

5. Cosmic sweater
Very slowly working on this.

6. Knitted Socks
temporarily set aside in favor of the sweater

New Fabric September 2016 | Sew DIY

I also have a couple of secret projects in the works. As if I didn't have enough to do! September was also a good month for adding to the fabric stash. If you follow me on Instagram, you might have seen that I made a trip to Portland and did some fabric shopping while I was there. I visited three very lovely small fabric stores, Josephine's Dry Goods, Modern Domestic and Bolt (the latter two are in the same neighborhood). I've learned over the years that it's best to at least have an idea for what you'd like to make with a fabric. 

From Modern Domestic:
Ikat print for Dove top or Aster Blouse (shown above left)
Windowpane check for Alder Dress

From Bolt:
Floral for secret dress project (shown above left)
Striped knit for Lou Box Top

This month I'm starting a four month long partnership with The Fabric Store and they are very generously giving me fabric to play with each month. The Fabric Store has locations in Los Angeles (in photo above right), Australia and New Zealand. They specialize in New Zealand merino wool but also have lots of gorgeous cotton, silk, linen, knits and even some denim. I've made a few projects using their fabrics before and they are some of my favorite garments. The Los Angeles store is a beautiful (and peaceful!) place to shop. If you're not near one of their stores, they now have an online store.

From The Fabric Store
Red striped sweater knit for Toaster Sweater
Black linen for Secret Dress
Blue geometric print for blouse
Blue cotton floral for blouse or skirt (?)

What are you sewing this month? Any plans for the change of seasons? 

DIY Kimono Sleeve Dress - Review of the Tea House Dress pattern

$
0
0
Red Kimono Sleeve Dress, review of the Tea House Dress sewing pattern | Sew DIY

Looking back, I think it was the cover shot that sold me on the Tea House Dress pattern. It goes without saying that the model looks just beautiful but I was equally struck by the red fabric. It reminded me of fabric that I had in my stash. So of course, I snatched up the pattern. Because when you already have the perfect fabric just languishing in the closet, you have to buy the pattern and give life to the fabric. It’s honestly so rare that I see a pattern and realize that I have the exact perfect fabric waiting in my stash. It’s a rather kismet sewing experience. 

Red Kimono Sleeve Dress, review of the Tea House Dress sewing pattern | Sew DIY

So where is this magical fabric from? Well, about a year ago, I made my first, and so far only, trip to the Pendleton Outlet in Portland, OR. It was really fun to visit and I loved the fabric they had in stock. They are most known for their printed wool fabrics but I'm unfortunately allergic to wool. So I was really delighted to find a fair amount of wool-free garment fabrics. I bought this red cotton print, a blue and white check cotton and a blue print crepe. This red fabric is the first of the batch that I have used. It feels so special that I didn't want to waste it on just any project.

Red Kimono Sleeve Dress, review of the Tea House Dress sewing pattern | Sew DIY

The fabric is very soft with a nice drape. It's so soft that it almost feels delicate but it's not thin and has no show through (yay!). My skin can be pretty sensitive so I am very pleased that the fabric is so soft. Did I mention that it's soft? hee hee. Like most cottons, it was very easy to work with. On further inspection of the photos on the pattern product page, I think this exact fabric is used in one of the samples!! I now wish that I had taken a closer look sooner. In the photos, I can see that some of the pattern pieces were cut on the cross grain to create contrast in the subtle dashed stripe pattern. I totally would have copied that if I had noticed earlier. 

Red Kimono Sleeve Dress, review of the Tea House Dress sewing pattern | Sew DIY

As mentioned, the pattern is the Tea House Dress by Sew House Seven. I hadn't heard of this pattern company before this dress and I'm very glad that I discovered it. This pattern was the first one I used from them, although you might remember that I posted about their Nehalem Pants a couple weeks ago. By the way, I've also bought their new pattern, the Toaster Sweaters, again because I have the PERFECT fabric for that pattern. I was actually thinking about looking for a sweater pattern with set in sleeves and then I saw theirs. So of course I bought it.

Red Kimono Sleeve Dress, review of the Tea House Dress sewing pattern | Sew DIY

Anyway, back to the dress. This dress is fairly simple with kimono sleeves and no zipper or other closure. However, there are a lot of pattern pieces because there are a lot of great details in this dress. There is a yoke in the front and back, a back pleat, angled patch pockets that are cleverly sewn into the seams of the skirt and a tie at the waist. I made view B with a waist tie that is wider and attaches to the front yoke.

Red Kimono Sleeve Dress, review of the Tea House Dress sewing pattern | Sew DIY

For the size, I cut a size 10 at the bust and tapered to an 8 at the hips. My measurements are roughly bust=38, waist=28 and hips=39. So there’s about 5.5 inches of ease at the bust which seems like a lot but because the design has kimono sleeves, I figured I’d need a little extra. 

During construction, I made a few notes on construction. To help topstitch the pockets, I glue basted down the flap. Because it’s cut on the bias it was getting really warped without the glue. I trimmed more seams than the instructions indicated, just doing what I normally do. Specifically, in on step I trimmed the yoke facing down and folded in more than 1/2 inch before hand stitching in place.

Red Kimono Sleeve Dress, review of the Tea House Dress sewing pattern | Sew DIY

I wouldn’t mind this dress being longer. I was actually a little surprised at how short it was when I first tried it on. Isn’t that silly? I think my original plan was to cut the shorter length because I thought the longer length would be overwhelming, with the loose fit and the bright red fabric. But when I went to stitch the side seams I realized that I had cut the back at the longest length. whoops! Anywho, if I make this again, I’ll add at least an inch so that it sits right on the knee. I’m 5’11” so I usually need extra length.

I haven't worn this dress yet and I'm not really sure what occasion it would be right for. Maybe a daytime party? I do think it's really pretty and I'm really glad that I made it. Between that super soft fabric and the generous fit, it's very comfortable to wear. I'm sure I'll be able to find an occasion or three to wear it.  The design is really classic and looking more at the photos on the product page I'm thinking that the top would be fun to make too. Have you tried this pattern?

DIY Plaid Cross Back Dress

$
0
0
Plaid Cross Back Dress, review of sewing pattern Butterick B6351 | Sew DIY

I'm not quite sure where I first saw Butterick B6351. Maybe Instagram? But I do know that it was immediate love. I noted the pattern number and at the first Joann's pattern sale (sad but true) I snatched it up. First off, I love the open back. It's a little sexy but still provides coverage. I also love that the pattern comes with an option for shorts or skirt.

DIY Plaid Cross Back Dress, review of sewing pattern Butterick B6351 | Sew DIY

I made an open, cross back dress once before (4 years and one blog ago!), by adapting Simplicity 1873 and it seemed to go a lot easier than this one. This wasn’t super hard but there were a lot more steps than I expected. I had to pay careful attention to every step, especially around the waistband.

Plaid Cross Back Dress, review of sewing pattern Butterick B6351 | Sew DIY

I cut a size 16, according to my bust measurement, and used the D cup pattern. I think I should have used the size according to my upper bust because I ended up having to take out about 1.5 inches at the bust side seams. I also reduced the length of the back elastic by about a couple inches. Make sure to try on the dress before stitching down the second side of the elastic. I probably should have cut a size 14 with the D cup and it would have fit a little better from the beginning. Since I made this I’ve been diving into the full bust adjustment (FBA) and I understand it much better than before. And it’s not as hard or time consuming as I once thought.

DIY Plaid Cross Back Dress, review of sewing pattern Butterick B6351 | Sew DIY

The back seems to have a little too much fabric for me. I’d like it to sit closer to the body. Sometimes it reveals my bra back but maybe adding a tack between the two layers would help that.

Plaid Cross Back Dress, review of sewing pattern Butterick B6351 | Sew DIY DIY Plaid Cross Back Dress, review of sewing pattern Butterick B6351 | Sew DIY

I made view B of this pattern which is exactly the same as View A except it has a hem band. I wasn’t sure if I’d do a hem band but I definitely needed the extra length. I had enough fabric, so I cut my hem band on the bias. I love the contrast the bias hem creates.

DIY Plaid Cross Back Dress, review of sewing pattern Butterick B6351 | Sew DIY

The fabric is a vintage cotton that I inherited from my grandmother. I’ve been saving it for years and I’m really glad that I used it for this dress. I think it’s the perfect pattern and fabric pairing. It’s a really interesting woven fabric where the weave creates the geometric design. See this instagram post for a closer look. I used to use a lot of vintage fabrics, mostly from the thrift store, but over the years I’ve felt that they can sometimes feel too costumey for me. But this fabric has such classic colors that it doesn’t feel dated.

DIY Plaid Cross Back Dress, review of sewing pattern Butterick B6351 | Sew DIY

I really, really love this dress. I just feel so happy wearing it. It’s even kind of casual when paired with my Keds. If I’m ever invited to a croquet party you can make a pretty safe bet that I’ll be wearing this dress.

The Colette Sewing Planner

$
0
0
Colette Sewing Planner | Sew DIY

Even though I'm a rather messy, creative type, I do love organizing. My buttons are sorted by color into little bins, My bias tape is folded and stored in rainbow order. My fabric is neatly folded and organized (until I decide to take it out and start playing, then the fabric is EVERYWHERE). When it comes to organizing my sewing projects, I'm a little more haphazard. I keep a very long list of things that I'd like to make and put the top ones on my blogging calendar. Nonetheless, I'm very easily distracted by new ideas and occasionally make detours from the list.

Last month I made a visit to Portland and was lucky enough to stop by the Colette studio and meet the wonderful folks behind Colette Patterns and Seamwork Magazine. It was really lovely to see their space and meet them in person. While I was there, they gave me an advance copy of their new Sewing Planner. It's a fantastic journal/planner made just for us garment sewists. And just the thing to up my project planning game.

The Colette Sewing Planner | Sew DIY

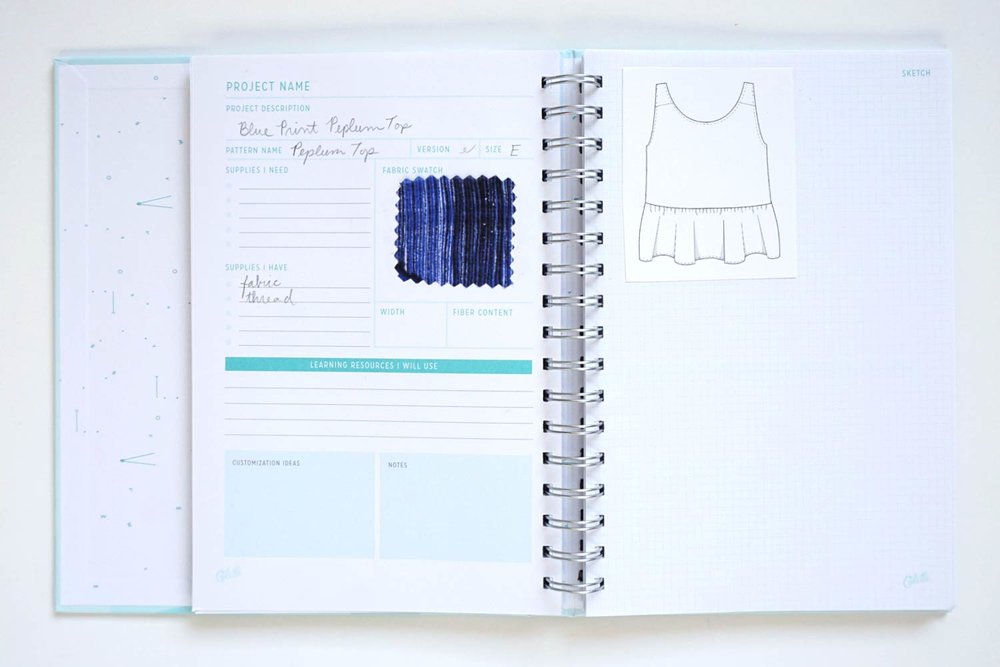
The planner is a beautiful spiral book with a hard back cover. It will lay flat for all your note taking and be protected by the sturdy cover. It starts with a section to make notes about your style, preferences and measurements. Then there are two big sections where you can plan your projects. One section is for Spring/Summer and the other for Fall/Winter which is a nice way to keep your seasonal wardrobe organized. I really love that there are lots of project pages cause I love making LOTS of things. Then in the back of the book is a section of helpful resources with sewing term definitions and information about needle types and things. Throughout the book are little sewing tips. I've already found a few helpful gems in there!

The Colette Sewing Planner | Sew DIY

I've really been enjoying playing with the journal and taking my planning from apps into a physical form. I love that I can flip through the pages and get visual of my current and future wardrobe. I'm also hoping that it will help me keep better notes on projects because sometimes I just can't be bothered to go to the ol' laptop and write something down. Plus I'll be able to keep all my drawings in there too. 

To get your own Colette Sewing Planner, head over to their shop. It's a great resource to add to your collection and as the holiday season approaches it's a great item to add to your wish list and your gift list too! 

10 Fall/Winter Dresses – Sewing Pattern Roundup

$
0
0
10 Fall Dress Sewing Patterns | Sew DIY

While many dresses can be worn throughout the year, the fall/winter dress is distinct in a few ways. It preferably has sleeves and a little more coverage than your summer sundresses. It also needs to lend itself well to layering with tights and sweaters. Here I've rounded up 10 of my favorites for the season with a mix of casual and fancy styles that will cover any occasion.

10 Fall/Winter Dress Sewing Patterns

1. Alix Dress by By Hand London
This dramatic beauty is a pretty new pattern. I love the billowy sleeves. And there are no zippers to insert and slow you down!

2. Serena Knit Dress by StyleArc
This dress looks super comfy (cause knit!) but also really flattering. Such attractive style lines!

3. Simplicity 1314
I've owned this pattern for a while and just like the Serena, I love the princess style seam lines. It looks so cool made up in a mix of fabric and faux leather like on the pattern cover.

4. New Look 6469
I have a vintage dress with similar style lines that I love to wear to fancy parties. It's totally covered up on top but you get to show some leg with the short, swingy skirt. 

5. Coco Dress by Tilly & The Buttons
This dress is just adorable. It looks super comfortable, easy to make. Plus it pairs well with tights and the sleeves will keep you warm.

6. Renee Dress by Republique du Chiffon
Another new pattern on the scene, this will give you totally different looks depending on your choice of fabric. 

7. Helmi Tunic Dress by Named Patterns
One of the more casual dresses in the roundup, this tunic would look great paired with tights and boots for winter and it would even work with bare legs in summer.

8. Butterick B6388
This dress looks incredibly cozy!! I love the drop shoulder and wrapped lapel. Plus there's a really cool back yoke detail. 

9. Vogue V1460
I love this dolman sleeved blouson style dress. It's kind of a mature style but would look really elegant on anyone. Really great for all of those holiday cocktail parties.

10. Wren Dress by Colette
Another one that's in my stash that I have yet to make. This classic design would be perfect for the office or even holiday dinners.

Have you tried any of these patterns? What dresses are you planning to sew this Fall/Winter? It's not very wintery but I'm really wanting to make Vogue V1501. I just need to find the right fabric. 

Viewing all 289 articles
Browse latest View live